Steps to make your first game on Roblox

Roblox is a wonderful platform and it is perfect for those who are interested in creating and making unique products for other people. More and more content creators have managed to download it and create a fun world to hang out in with friends.
Would you like to do the same? Do you want to create your own world to have a good time with your friends? Well, then this article is for you. In this guide, we will explain the steps to make your first game on Roblox.
BEFORE YOU START
Are you ready to create your own world? Have an idea of what it will be like? Great. But before you start creating and letting your imagination fly, you need to download Roblox studio.
Click on “Start Creating” and the website will check if you have Roblox studio installed. If you already have the program installed, it will launch on your computer. If the program is not on your computer, then it will start the download process.
WHAT IS ROBLOX STUDIO?
This is software from the ROBLOX Corporation dedicated to creating games on the platform. It is installed automatically on your computer during the installation of the ROBLOX Launcher. Users can also create in-game products, which are purchasable content through one-time purchases as well as microtransactions through developer products. On this website, developers can exchange Robux, earned from various products of their games, for real currency through Developer Exchange and Premium Exchange.THE FIRST STEPS IN MAKING A ROBLOX GAME

Now that the software has been installed on your computer we can start with the basics of the game. In the "All Templates" tab, select “Baseplate.” It is best to start with something simple.
We highly recommend that you take the time to familiarise yourself with Roblox Studio's many navigation buttons and menus. You can also visit the Roblox Wiki to further understand what these buttons are and how they work.
USEFUL COMMANDS
There are several commands in Roblox Studio that can save your time, so do not forget to use them:- Focus the camera on the selected object: F
- Group objects together: Control + G
- Redo actions that were undone: Control + Y
- Rotate selected parts: Control + R
- Undo actions: Control + Z
CREATING PARTS

Start with something simple and open a tab with 'Parts.' Parts are the basic blocks that allow you to build in Roblox. You can choose between Blocks, Spheres, Wedges, and Cylinders.
But to build something simple and uncomplicated, you can use just blocks.

Then use the “Scale” tool to resize. Click the left mouse button to increase or decrease the size of the blocks. You can use the “Rotate” tool to change the angle. The “Move” tool allows you to move the object along the X, Y, and Z axes.
CREATING PROPERTIES
If you do not like the colour of your block and want to change it, then look at the bottom right of the screen for a tab called "Properties panel."
You can also change the Transparency and Reflectance of the object and set the surface texture. If the part is not fixed, gravity will act on it and it will fall down instead of remaining floating in the air. If you enable “CanCollide,” players will collide with the part. Otherwise, they may run through it.

TOOLBOX AND FREE MODELS
If you want to install an item in your game that has already been created by someone else, you need to look in the left-hand corner for the tab called "Toolbox." From the huge list of models provided, choose a suitable one. Use the search tab so you do not waste time.
SPAWN AND MORE
Any world should start with a spawn, which is where the player starts their journey. To make a spawn, you need to find the “Spawn” tab on the top right-hand side of the screen.
To make a spawn point less noticeable, go to the “Properties” tab and decrease its Transparency to 1. And then in the “Workspace” tab, remove the “Decal” tab. If you want players to be able to walk through the spawn point, on the “Properties'' tab, uncheck the “CanCollide” tab.
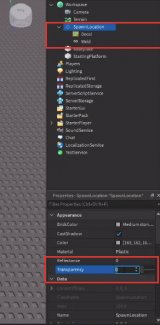
Objects and other things that you place in the game can be found in Explorer, under the “Workspace” tab. If you want to remove an item from your world, simply click on it in the list in the “Explorer” tab, and using the "Delete" button you will remove the item from your world.

SCRIPTING
The next step will be a complicated one, so we strongly recommend that you familiarise yourself with the Lua programming language before you start creating your Roblox world.WHAT IS LUA?
Lua is a very powerful tool that can be used to perform the following tasks:- Define, store and manage basic game data.
- Create an artificial intelligence system for games.
- Real-time game event management.
So, if you want a block that is capable of killing a player who steps on it, then follow the instructions below.

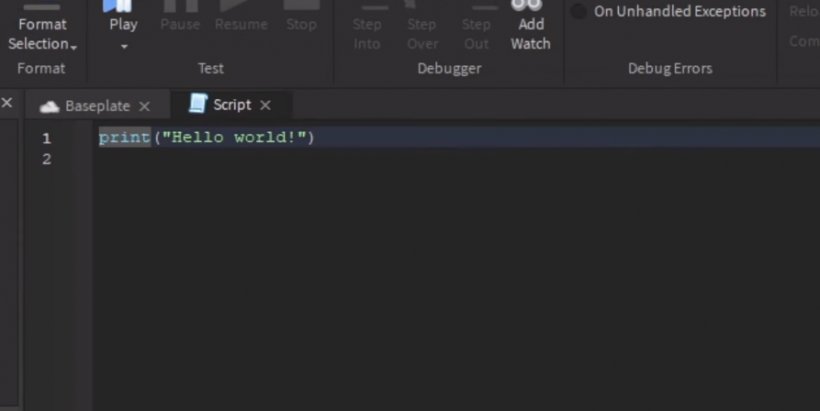
Select the block that should kill players from the Workspace tab and go to the "Script" tab. You will be taken to the "Script" tab, where you will already have a pre-made "Hello world" text. Since Roblox uses the Lua programming language, this should not be a problem.
We will now explain what is meant here. The tag “Functions” is a reusable group of code that performs a particular task. In our case, the function is triggered when the player touches the block. The tag “Parent” is the block itself. The tag “Humanoid” checks whether what has touched the block are the character himself. If a character was touched, it executes the rest of the code.

TESTING PART
When the finishing touch is done, you should always test the game yourself to see what kind of glitches or problems players may encounter as they progress through your map or world.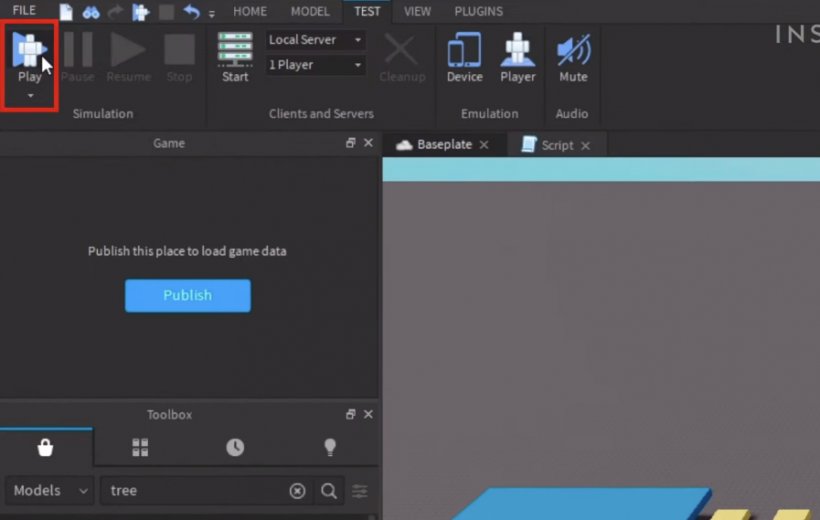
To test your game, go to the “Test” tab and then go to the “Play” tab. This will put you on the map and allow you to check what results you have achieved.
PUBLISHING A ROBLOX GAME
When you think your map is ready and you are happy with the result, the next thing you need to do is publish the map. To do this, click on the “Publish” button at the top left.
A new window will then open. At the bottom of this window will be the phrase "Create New Game." There you will also have to give the game a name, a description, and a genre, and you will also need to choose the devices on which players can play this map.

If you want to make the map playable by specific players or to make the map public, go to the Game Settings tab. Go to the Permissions tab and choose the option that suits you best.
CONCLUSION
So there you have it. Your Roblox game is ready and your friends can play on it!And remember, if it does not work the first time to create something extraordinary and cool as other players, do not fall into despair. Rome was not built in a day. So be sure to practice and learn the Lua programming language. Then you will manage to create something cool, something that lots of players from all over Roblox will want to play. Good luck!