How to access your iPhone using SSH
It’s like a file explorer type thing
We’ve already taken a look at how to jailbreak your iPhone and how to secure it once it’s out from behind iTunes’s bars. Now we thought it was time you got to know your iPhone more intimately, and that means poking around its insides.
As always, be warned that doing so gives you the opportunity to brick your beloved iDevice, so tread carefully.
Why would you want to peer into your iPhone’s abyss? Well, accessing its file system means you can transfer files - any files - to and from your device that you want to use, as opposed to files Apple wants you to use.
If you’ve discovered Cycorder - the free iPhone video recorder – then you’ll need a way to get those videos off the handset. Got a ringtone you can’t add any other way? Fancy streamlining your iPhone operating system? Want to add some ROMs to your emulators? Want to get your photos off the iPhone wirelessly?
 This is all done using Secure Shell (SSH), which is a file transfer protocol not unlike FTP, only this one works through wi-fi. Here we’ll take a look at how to connect your PC or Mac with your jailbroken iPhone and start sending data back and forth.
Depending on how you broke out of jail, you might or might not have SSH installed on your iPhone (or iPod touch, of course). If you haven’t, search in Cydia for an app called OpenSSH, install it, and restart.
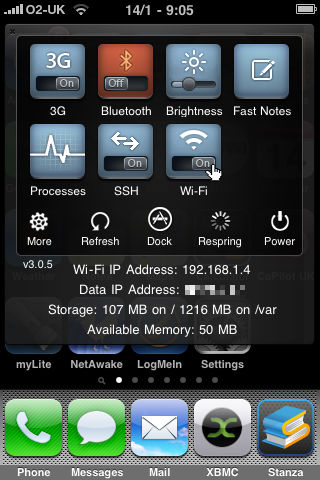
 This isn’t your ordinary kind of app, and there’s no icon for it on the Home screen. The best option for using SSH is to use SBSettings, which offers up a safe and secure toggle button to turn SSH on and off.
As you might recall from our iPhone security feature, it’s SSH that hackers have used to interfere with folks’ iPhone remotely, so having the option of turning it off is a good idea when it’s not in use.
 Once SSH is installed and switched on, you need to find the IP address of your iPhone on your network. This is pretty easy if you’re using SBSettings, as it tells you right there on the toggle screen. Alternatively, go into your settings app and look under wi-fi Networks.
Now it’s over to the PC (or Mac). If you’re running Windows, grab yourself the free SSH client WinSCP, while Mac users are advised to go for Cyberduck. You need to enter the details of where this client will find your iPhone, so add the IP address we just found as the host, then the username and password of your iPhone’s SSH system.

Not sure what that username and password is? That’s easy. The factory defaults are:
Username: root
Password: alpine
However, if you followed our previous advice to secure your iPhone’s root access, that password will be whatever you changed it to. The username is the same, though.
Make sure your iPhone is switched on and live, and connect the SSH client. It’ll work over wi-fi, so you don’t even need your iPhone plugged into the USB port, which is nice.

The SSH client will now show you the file and directory structure in your device. You can browse, run commands, upload and download any files you want.
There are lots of great things you can do once you have open access to your iPhone that we won’t go into at this point (I’ve eked lots of extra speed and memory out of mine by shedding unwanted language files and unnecessary start up daemons), but here is where you really take ownership of your device.
Over the next few weeks we’ll run some more jailbreak features that will require you to make use of SSH access, so familiarising yourself with the concept now will pay off.
