How to make your own duct tape iPhone case
No, we're not just wrapping it in sticky tape

It’s good to keep your iPhone in a case simply to stem the fingerprints and ear grease that get all over its nice shiny casing. But if, like me, you’re from Yorkshire and you don’t want to pay for a case, Pocket Gamer’s here to help you.
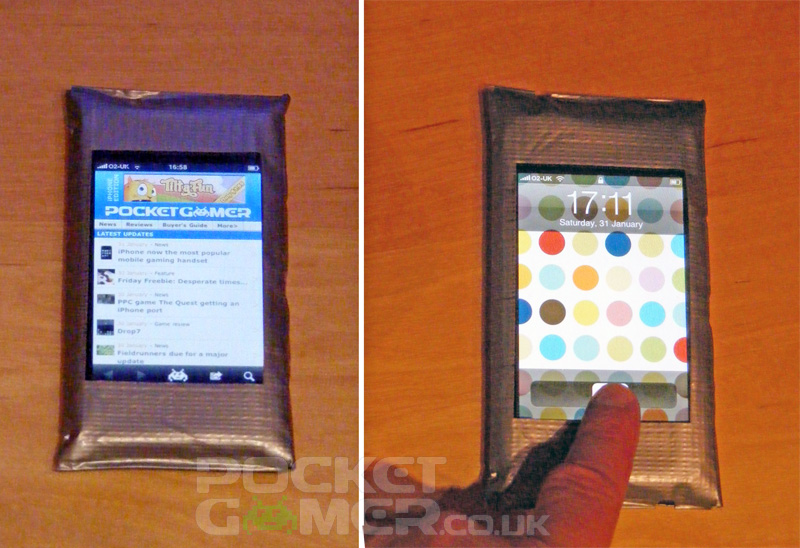
We’ve put together an iPhone case made from a plastic CD slip case and duct tape. It’s got a window so you can see the screen, and it’s got access to the microphone and headphone jack.
There’s also a sweet little surprise that comes bundled with your homemade iPhone case, which we’ll reveal further down the page.
You don’t need much duct tape, so that old roll end you’ve got in the shed will probably be just fine. The only other thing you’ll need is some sharp scissors that you don’t mind getting a bit gummed up (or a craft knife, if you’re careful with it). Here we go.
 |
|
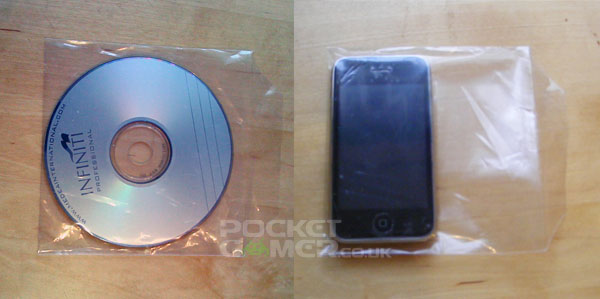
| Here’s the type of CD case we used. It’s the flimsy clear plastic kind, though a sandwich bag or other kind of thick, clear plastic stuff will do just as well. The benefit of these CD cases is they’re a perfect fit for the iPhone, so you don’t need to seal up any of the sides. |

|
 |
|
| Put your iPhone in the CD slip case, push it right up to the sealed end and mark where the right hand edge of your iPhone comes to. Take the iPhone out, draw a line down with a ruler and cut the slip case off along this line. |
 |
 |
|
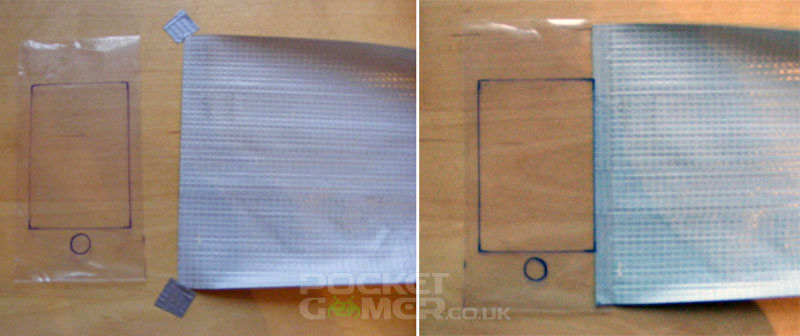
| Put the iPhone back in and mark where the corners of the screen are on the front of the slip case. Take the iPhone out, and draw a rectangle using the marks so you can see exactly where the screen will be when the phone’s inside the slip case. We’ve marked where the Home button is, but this is just to help illustrate where the iPhone fits in the case - you don’t need to. |
 |
 |
|
| This next bit is kinda tricky, but do your best to make a neat job of it. Cut off several strips of duct tape (we used four) and lay them out with the sticky side up. Overlap the pieces of tape to make a ‘sheet’ of duct tape (still with the sticky side up) that’s just a few millimetres shorter than the height of your slip case. To clarify, when you stick your slip case to this duct tape sheet, no duct tape will protrude over the top or bottom of the slip case. Cut a straight edge down the left hand side of the duct tape sheet. |
 |
 |
|
| If it helps, use two tiny pieces of tape to hold the duct tape sheet flat to the desk. Put them on as loosely as possible so you can remove them again in a moment. Turn the slip case over so the marks you’ve drawn on it are face down. Stick the sealed edge of the slip case to the duct tape sheet, aligning the tape with the line you’ve drawn to show where the iPhone’s screen will be. |
 |
 |
|
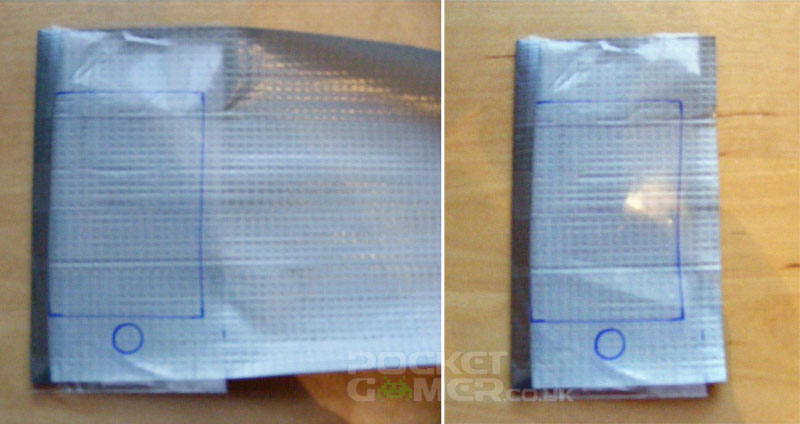
| Turn the slip case over so the duct tape sheet now sticks all the way across the back of the slip case. Trim the duct tape sheet so it’s about 5mm longer than the open edge of the slip case. |
 |
 |
|
| Fold this 5mm of tap over the open edge of the slip case so it goes inside, to give you a neat edge where the duct tape finishes. |
 |
 |
|
| Make another duct tape sheet around 110mm in length, that’s also just a couple of millimetres shorter than the height of the slip case. This duct tape sheet needs to be neatly cut down both the left and right hand sides. Stick the duct tape sheet to the front of the slip case along the opposite line you drew to mark where the iPhone’s screen will be (the side that’s next to the open edge of the slip case), making sure the duct tape sheet doesn’t overhang on either the top or bottom of the slip case. Turn the whole case over, so the sticky side of the duct tape sheet is facing upwards, and the ‘window’ on the front is facing downwards. |
 |
 |
|
| This next bit is also a bit tricky, so be careful and take your time. Take the right hand edge of the duct tape sheet and stick it just inside the slip case, aligning it with the mark you drew for the iPhone’s screen (note: the mark will be on the opposite side of the slip case to the one you’re sticking the duct tape sheet to). As you fold it over, don’t let the two sticky faces of the duct tape sheet stick together - yet. Once the edge of the duct tape sheet has been stuck to the inside of the slip case, carefully flatten the two sticky faces of the duct tape sheet to create a flap. Try to make it as neat as possible, but don’t worry if it gets a few small creases and wrinkles in it. If you balls it up, start again from Step 8. |
 |
 |
|
| We’re now going to neaten things up. Stick a piece of duct tape along the top line you drew to mark the iPhone’s screen. About half the tape will be sticking up above the slip case. Align the left hand side of the duct tape strip with the left hand ‘sealed’ side of the slip case. Trim the duct tape strip with the right hand edge of the flap. Turn the whole case over and cut down the duct tape strip in line with the slip case, and fold both sides of the duct tape strip down against the back of the case. Note: If you don’t put that cut in the duct tape strip, you’ll seal up the opening the iPhone goes in, so don’t miss this step out. Repeat this step along the bottom of the case. |
 |
 |
|
| For the sake of extra neatness, we also put another length of duct tape over the length of the flap, to cover some of the wrinkles and make it a little more substantial. You’ll need to cut the corners out of strip of duct tape so you can fold the top, bottom and side in and stick them down onto the flap. |
 |
 |
|
| Turn the case over so the window if face up and put your iPhone on top of the case. As you look at the bottom of the iPhone, there are two small oblong holes with mesh inside them on either side of the connector. The one on the right (toward the open edge of the slip case) is the microphone. Put a small mark on the bottom edge of the case in line with the microphone. Go to the top of the iPhone, and place a mark on the top of the case in line with the headphone jack (this should be nearer toward the sealed edge of the slip case). |
 |
 |
|
| Put the iPhone to one side. Get a hole punch (we used one of those that only does one hole, to make the photo clearer) and punch a hole where the two marks are. Try to punch the holes so you only bit a semi circle out of the edges of the case - this way you get a nice round hole as you’ve bitten out of the front and back of the case at the same time. |
 |
 |
|
| You can now put the iPhone in the case. Turn the case over and tuck the flap inside to hold the iPhone inside the case. |
 |
 |
|
| The sweet little surprise we mentioned is that these CD cases hold a minuscule static charge because of the type of material they’re made from - nothing that will have any effect on the iPhone, but it means the touchscreen will work through the window. So with the Pocket Gamer Duct Tape iPhone Case, you can answer calls, control your music and use all the other touchscreen functions without removing the iPhone from the case! If you haven’t already, check out our equally indispensible guide to making your own free iPhone dock. |
 |
