Survivor.io guide - Seven tips to improve your gameplay

Want to learn all the most useful Survivor.io tips and tricks to pass the levels and get the right upgrades? That's exactly what we are going to cover in this guide. No matter if you're a complete beginner and want to learn how to get the right equipment for each stage, or you're a seasoned player but got stuck at a specific stage, our Survivor.io guide should most certainly come in handy.
In this article, we're going to talk about some of the best strategies when it comes to upgrading your equipment (the actual equipment), but also which upgrades you should focus on based on how useful they are at max stars and at low stars. This has been quite a dilemma, since (if you've played the game) you probably noticed some of the levels being arguably tougher than others - monsters don't die in one single attack, and they somehow seem to deal a lot more damage than you'd like.
Before we dive into the guide
First and foremost, you need to make sure you're accustomed to the game's controls. They are simple as it's just a joystick on the screen, but you must be careful where you place your finger on the device because you might cover a good portion of it, which can be dangerous when you see a monster wave approaching.Make sure you've got a good handle on the controls because some of the tips we're going to share below will require you to pull some stunts! So, if you're not comfortable doing a 180-degree turn and bolting out of a dangerous situation, we recommend you play the first stage a little bit more until you're able to respond quickly enough (trust us, you'll need it later on if you plan on getting to the higher chapters).

Don't forget to claim the redeem codes!
We also have the latest Survivor.io codes, so if you haven't managed to claim them yet, make sure you do so as soon as possible since they are only valid for a limited time. These codes will give you Gems, Coins and even equipment upgrade material, and if you want to make it into the late game, you'll need every bit of help you can get!So without further ado, let's dive into the Survivor.io guide!
1
Tip #1 - Always equip the best gear you have

In the character tab, you will be able to see all the equipment pieces you have collected throughout the game. These can come in various rarities, but that doesn't always mean the rarer a gear is, the better it is for a specific stage. You should always keep in mind that some of the equipment might be better than others even if it's not as rare, so you should consider upgrading them all slowly.
At the start, you can focus on more generic equipment - those that can be useful in every situation (those pieces that give you ATK, HP, DEF, and not some niche stats). Also, if you happen to get some of the best gears in the game, you should make these your priority.
Upgrading the equipment will also be rather expensive in terms of Coins, so make sure you prioritise the stats you need the most firstly, such as the weapon which boosts your attack.
2
Tip #2 - Pick the appropriate skills and evolutions for each stage

In every single stage, you will be given the option to pick from a number of different skills. Depending on what enemies you're facing and how each stage is, you might be tempted to pick the same skills that worked before in every single instance. While SOME of these skills might be good (for example, Guardian), not all of them are made equal.
Since with some enemies, it's not ideal to get in melee range, you want to make sure you're eliminating them before they reach you. In that case, the Forcefield Device can work pretty well. However, you can't always rely on it, so you need to understand how to pick the best skills for each chapter.
For stages where mobs are heavily melee focusedIn the stages where you need to get up close and personal with the enemies, you want to either use Guardian, Forcefield Device, or even the Drones (Type A and Type B). Additionally, the Boomerang or the Drill Shot can be good for dealing with enemies that are slightly far away and create a pathway to escape from tough situations.
For stages where you can't approach the mobsMost of the time when you cannot get close to the enemies (take the butterflies, for example, which leave a toxic gas behind), you want to tackle them before they get too close and corner you. In that situation, the Drill Shot and the Lightning Emitter are great, but also the RPG and Molotov. These can cause periodic damage to enemies (or intermittent damage, if you will?) and they can allow you to also have some upgrades to the Katana or Kunai.
Generally good skills and evolutionsSome of the best skills we've found in most situations are the following:
- Drill Shot
- Guardian
- Lightning Emitter
- Forcefield Device
- Ronin Oyoroi
- Eko-Bracer (especially with Guardian)
- Energy Drink
- Sports Shoes
These are some of our favourites, but of course, you can pick your own and you should always adjust the skills and evos you pick based on what you currently have and what you need to further pass the stage.
3
Tip #3 - Dodge huge waves of enemies

We're well aware that sometimes having a huge wave of enemies approaching, especially when you haven't managed to get the right skills and evolutions, can be quite tricky. Whenever that happens, don't despair and don't restart the stage. You might just need to pick a few more evolutions or skills and you'll have a pretty decent character.
Every time you see a huge wave approaching, we recommend you start running towards one side (any direction, really) and keep that direction while avoiding the monsters. Take the path with the least mobs, because there will almost always be one. Once you put some distance between you and the mobs, you can try to slowly turn around and pick up the drops, while still maintaining a relatively safe distance.
Never do a 180-degree turn into a huge zombie horde, because that will almost always end up in death. You should always look for the gaps in monsters where you can pass through - even if it seems like a small gap, you'll probably make it since the character outline is slightly smaller than it appears.
4
Tip #4 - Don't forget to pick up the drops

During stages, you will notice mainly five items dropped in each stage - EXP (or energy, however you want to call it), Coins, HP potions, Magnets and Bombs. Of course, you will have the occasional elite mob chest drop with a free upgrade (or three, if you're lucky), but leaving that aside, we can focus on these five drops.
EXPEXP or energy is what allows you to get more upgrades. Make sure to pick up as much as you can, since that will help you achieve your goal and ultimately pass each chapter.
HP PotionsIf you've ever been in a situation where your health was low and you noticed an HP potion on the ground, you probably let out a sigh of relief. That HP potion can turn a battle in your favour quite often, so try to remember their locations and pick them up when your HP bar drops.
CoinsCoins are not such a wow factor in the game, but you will need to get as many as possible so you can upgrade your equipment. So, you need to try and open the cardboard boxes and pick up as many as you can!
MagnetsMagnets will draw all the drops you can see on your current screen. There is a slight delay between when you pick up the magnet and when the items are drawn to you, so you should use that delay to quickly reposition your character so you will have a lot of drops on the screen. Keep that in mind because later on, when you're facing huge waves of monsters, that can really come in handy by giving you a one-up or two-up even.
BombsBombs essentially eliminate all opponents currently seen on your screen. If you don't have a lot of enemies on the screen at one moment but there is a bomb around, you can try to lure them towards you and then walk over to pick it up. It would be a waste to use a bomb just for a handful of zombies.
The elite mob chestThis is obviously great, and you need to pick them up every chance you get. They can give you one free upgrade, or three if you are lucky. Whenever such a chest is available, a pointer will appear on the screen leading you to its location.
5
Tip #5 - Get free Gems and Gold by watching ads

In the shop, you will have free offers every single day, so you should take the free ones. And if you want even more freebies, you can choose to watch a few ads to claim them. Generally, you need to wait for a minute or so between ads, but the rewards are definitely worth it - you can get free Gems and Coins, and little by little these rewards will add up.
6
Tip #6 - Open the free Chests and save Gems for the 10-summons

There are two chest categories in the game - the noob one and the pro one. The first will give you lesser equipment than the latter, but you can open multiple such chests per day for free. The good chest can only be opened for free once a day, so the best solution would be to open all of the chests as often as you can.
In order to do that, you can watch some ads and hope that you'll get some pretty decent drops. As a f2p player, open these chests and slowly work your way to good quality ones.
7
Tip #7 - Merge your equipment into better gear

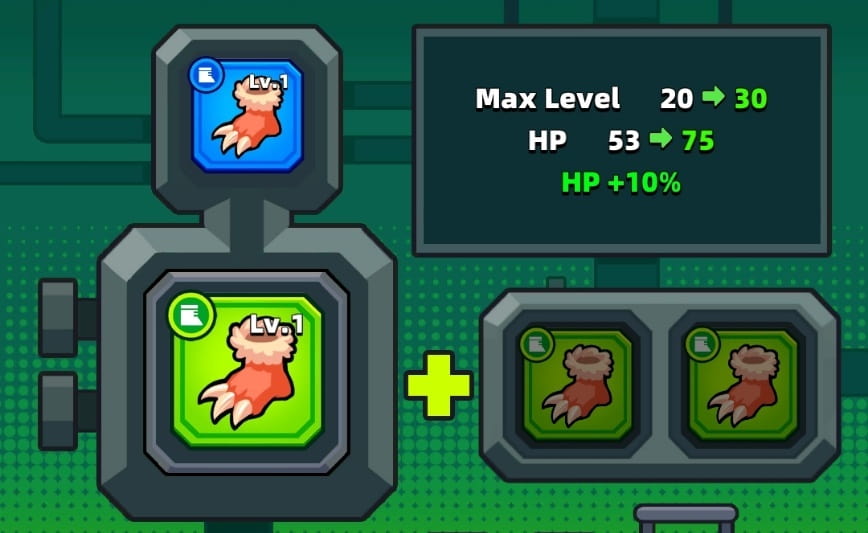
In case you're not sure what to do with all of the grey equipment you've received from the boxes, we have just the solution for you - merge it! Three pieces of the same equipment can be fused into a higher tier one, so you should always save all the pieces you get and use them when you have enough. All you need to do is tap on the equipment piece you want to upgrade, tap on Upgrade, and a menu will automatically open where you can see how many pieces of said gear you own.
Getting full purple gear will take a while if you just upgrade the pieces since the quality is as follows:
- Grey (normal) -> Green (good) -> Blue (better) -> Purple (excellent) -> Yellow (epic) -> Red (legend)
That's our complete guide for Survivor.io. If you follow it, you're sure to max out your gameplay and get better at the game. For similar content, you can read the guide for Last Fortress Underground and Darkest Dungeon guide that will help you crawl those scary caves and dungeons without much fear for your companions!
